Company News
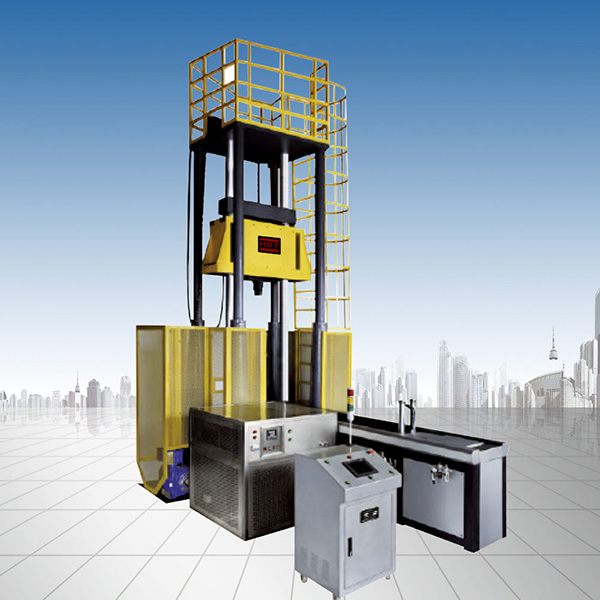
Installation and commissioning of hydraulic universal testing machine
Release time:2018-11-23 source:Jinan Hengsi Shanda Instrument Co., Ltd. Browse:
1. Preparation before installation
(1)Hydraulic universal testing machineIt should be installed in clean, dry, without vibration and room temperature can be controlled at (10~35) ℃ in the room. And there should be enough space in the room to ensure that there is more than70cmspace for testing and daily maintenance.
(2) Dig a hole downward to the installation position of the hydraulic universal testing machine, the size is larger than that of the base of the hydraulic universal material testing machine.50cm, the depth is not less than30cm.
(3) The watering intensity level in the pit is not less thanC20When pouring concrete, holes for anchor screws and pipelines for installation circuits and sensors are left. Leveling of planes of concrete foundations is applied.
(4) The hydraulic universal testing machine is connected to a three-phase and four-wire power supply, and the power supply should be equipped with an air switch and a leakage protection device. The wire should be larger than the ground150 cm, a manual switch should be installed on the wire to control the power supply of the test machine.
2. Preliminary correction of the installation accuracy of the test machine
The main body of the hydraulic universal testing machine should be adjusted by using a frame level or a wire hammer in the accessory to correct the verticality of the column in two directions perpendicular to each other, and by inserting small iron sheets at the bottom of the main body. Install anchor screws and use spring washer. Use cement mortar with high strength to solidify the screw holes of each foot, fill the gaps between the tester and the ground, sprinkle water and maintain for more than one week, and then strengthen the screws.
3. Connection of hydraulic system of hydraulic universal test machine
(1) Remove the bundles in each part and clean kerosene to clean the inside of the oil pipe, especially the threaded threads of the connecting ports of each oil pipe.
(2) Check whether the gasket at the joint is complete. If it is damaged due to transportation reasons, use the new gasket included in the test machine to prevent oil leakage during high pressure.
(3) Use a suitable wrench to connect each oil pipe. If it is seamless, the copper pipe should be connected to the main machine, and rely on the movement of the console to adjust the spacing to connect to the console end.
(4) Remove the residual oil in the hydraulic universal test engine oil tank and remove the residue in the oil tank.
(5) Uncover the iron door of the hydraulic control box and you can see the wire mesh oil filter. When filling the oil, it is poured into the oil tank through this oil filter. The test machine usually uses hydraulic oil. Hydraulic oil with higher viscosity should be used in summer and hydraulic oil with lower viscosity should be used in winter.
(6) Be sure to pay close attention to the oil level when refueling. The tester cannot work normally if the oil volume is too small. Too much oil volume will cause hydraulic oil to leak from the working cylinder port.
4. Electrical installation
The power supply voltage of the hydraulic universal test machine is three-phase380VThe electrical connection between the main body and the hydraulic control box is made of plugs. Before powering on, open the iron door of the hydraulic control box to check whether the wiring is falling off, whether the fuse is loose, and clean the dust and debris in the electrical box. After confirming that the equipment is connected to the power supply line, press the "Power" button on the hydraulic control box counter panel, and the indicator light will show that the information has been retrieved and powered on. Open the oil pump and check whether the operating direction of the oil pump is consistent with the direction indicated by the arrow. If the opposite is true, change any two connected positions, then activate the jaw seat lift button, remove the wooden block on the platform, unscrew the oil feed valve and raise the piston. Refer to the ruler on the main column to check whether the piston stroke limit switch works.
5. Debugging of hydraulic universal testing machine
(1) Turn off the oil pump motor and screw out the above oil pumpMSThe wire is blocked, and the air in the pump is discharged (and a small amount of oil flows out). After exhausting the air, the wire is blocked: start the oil pump to repeatedly lift the piston to drain the air in the oil cylinder and oil pipe.
(2) Pull the cold-bending support to both sides equally, and do not touch it when moving the crossbar lifts and lowers:
(3) Install spherical lower pressing plate on the platen, lift and move the cross beam to make the upper and lower pressing plates approximately apart20mm:
(4) Start the oil pump, close the oil return valve, open the oil supply valve to make the platen rise, and slowly increase the pressure:
(5) Check whether there is any oil leakage at each oil pipe joint:
(6) If there is oil leakage, tighten the joints at the oil after unloading the force,Material.
Recommended productsPRODUCTS