News
Specific operation method for automatic measurement of micro Vickers hardness meter
Release time:2019-03-28 source:Jinan Hengsi Shanda Instrument Co., Ltd. Browse:
Automatic measurement of micro Vickers hardness meter connects the microhardness meter to the computer through the CCD camera interface. The entire test process can be completed through simple operations of the keyboard and mouse. The measurement and control of this system are completed through high-resolution camera devices and computer software, which increases the speed and flexibility of the test, eliminates artificial operation errors of the eyepiece system, and can meet various microhardness testing requirements. This time I will share with you the specific operation method of automatically measuring micro Vickers hardness meter:
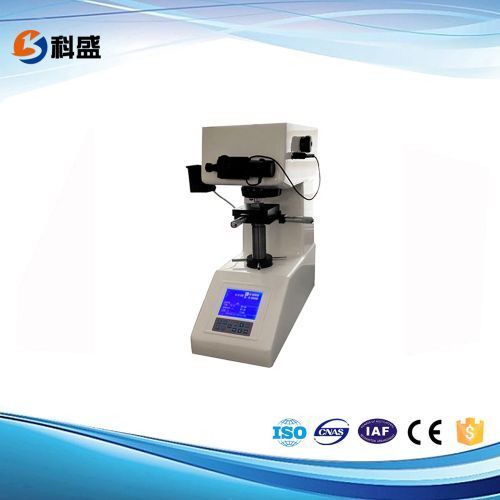
(1) Rotate the test force conversion handwheel to make the test force meet the selection requirements. When rotating the test force to change the handwheel, it should be carried out carefully and slowly to prevent shock from being generated too quickly.
(2) Automatically measure the micro Vickers hardness meter and turn on the power switch, and the indicator light and light source light are on. The LCD screen displays the test force indicated by the test force conversion handwheel at this time, and displays the initialization date on August 8, 1994.
(3) At this time, the cursor is displayed in 1994. Press the [TIME] or [TIME-] key to increment or decrease, increasing or decrementing 5 numbers each time. After selecting the year, press the [SPECI] key to select the month. At this time, the cursor is displayed in August. Press the [TIME] or [TIME-] key several times to select the month. Then press [SPECI]. At this time, the cursor is displayed in the 8th, and the date is selected as described above. When the test result is output and printed, the typed year, month, date is displayed accordingly. If you do not need to print a date, you can press the [SPECI] key three times.
(4) After typing the date, the letters such as D1, D2, HV, N are displayed on the LCD screen, which means that the instrument has entered the working state.
(5) Automatically measure the micro Vickers hardness meter rotating lens and head conversion handle to make the 40X objective lens in front of the main body. (The total magnification of the optical system is 400×, and it is in the measurement state.)
(6) Place the standard test block or sample on the test stand and turn the rotating wheel to raise the test stand. The eyes are close to the microscope. When the sample is 2 to 3 mm from the lower end of the objective lens, a bright spot appears in the center of the field of view of the eyepiece, indicating that the focus surface is coming soon. At this time, it should slowly rise slightly until a clear imaging of the test block or the sample surface is observed in the eyepiece. At this time, the focusing process is completed.
(7) If the image observed in the eyepiece is blurry or half clear and half blurry, it means that the center of the light source deviates from the center of the system light path and the center position of the light bulb needs to be adjusted. If the field of view is too dark or too bright, you can adjust the light source strength by using the soft keys on the operating panel.
(8) If you want to observe the larger field of view on the test block or sample, you can turn the objective lens head conversion handle counterclockwise to the front of the main body. At this time, the total magnification of the optical system is 100X, which is in the observation state. When the 1OX and 40X objective lenses are converted, the focus surface changes slightly, and the lifting screw can be fine-tuned for focusing.
(9) Rotate the converter handle counterclockwise so that the head spindle is in front of the main body. At this time, the gap between the top of the head and the focused plane is about 0.4 to 0.5mm. Be careful when measuring irregular samples to prevent the pressure head from touching and damaging the pressure head.
(10) Automatically measure the micro Vickers hardness meter. Type the test force delay hold-load time on the operating panel according to the test requirements. Each time it is entered, it will be five seconds. [10] is added and [-] is reduced.
(11) Press the [START] key on the operation panel, and the test force is added at this time, and the [LOADING] LED indicator lights up.
(12) During the test force holding phase, the delay [DWELL] LED is on. At this time, the LCD screen counts down according to the selected time. The delay time has arrived, the test force is removed, and the test force is discharged. The UNLOADING LED is on. Before the LED is turned off, do not turn the indenter head to measure the conversion handle, otherwise it will affect the indentation measurement accuracy and even damage the instrument.
(13) Automatic measurement of the micro Vickers hardness meter rotates the converter handle clockwise so that the 40X objective lens is in front of the main body. At this time, the diagonal length can be measured in the microscope.
(14) First rotate the drum on the right side of the micrometer eyepiece clockwise to move the two trunking lines observed in the eyepiece similarly. When the edges of the two tick lines are close, the light-transmitting gap gradually decreases. When the two tick lines are in a critical state without light gaps, press the [CL] key to clear it.
(15) Turn the left drum to align the left etching line at one corner of the indentation, and then turn the right drum to separate the two etching lines to align the right etching line at the other corner of the indentation. When the diagonal line of the indentation is correct, press the button below the micrometer eyepiece to enter and display it after D1 of the display.
(16) Automatic measurement of the micro Vickers hardness meter When the drum on the right rotates, the number after D1 on the LCD screen flashes, indicating that the result has not been entered yet. When the result is entered, it will no longer flash and the cursor turns to D2. According to the above requirements, the length of another diagonal line is measured again. At this time, the hardness value of the LCD screen HV is displayed at the same time. Note: Indentation will more or less deform due to the roughness or flatness of the sample surface or the difference in flatness, so the diagonal measurement should be performed in two vertical directions and take its arithmetic average. (When performing Knuts hardness test, just test the long diagonal length and the HK hardness value will be displayed immediately.)
(17) The next test can only be carried out after this measurement is completed. If the measurement results are not satisfactory, you can repeat the measurement or press the [SPECI] and [RESET] reset keys to re-test. (At this time, the microscope engraving line needs to be re-zeroed)
(18) When the LCD screen displays the measurement times N≥1, press the [SPECI] and [PRI] printing keys, and the test results are printed and output from the printer. The first test result (N=O) will not be printed.
(19) When it is observed in the eyepiece that the indentation is too small or too large affects the measurement, the test force needs to be reselected and the test force needs to be turned to make the test force meet the requirements. At this time, the [SPECI] and [RESET] keys should be pressed, and the LCD screen will display the selected test force. At this time, the microscope line should be re-zeroed.
The above is a related introduction to the specific operation method of automatic measurement of micro Vickers hardness meter. I hope the above brief introduction can help you. At the same time, it also reminds you that when you don’t know how to use the purchased equipment and related precautions, you must not turn on the computer blindly to prevent danger. If you have any questions about the operation process, please call our company!


