Company News
Structural principle, purpose, installation and use precautions and maintenance of tensile testing machine
Release time:2018-11-23 source:Jinan Hengsi Shanda Instrument Co., Ltd. Browse:
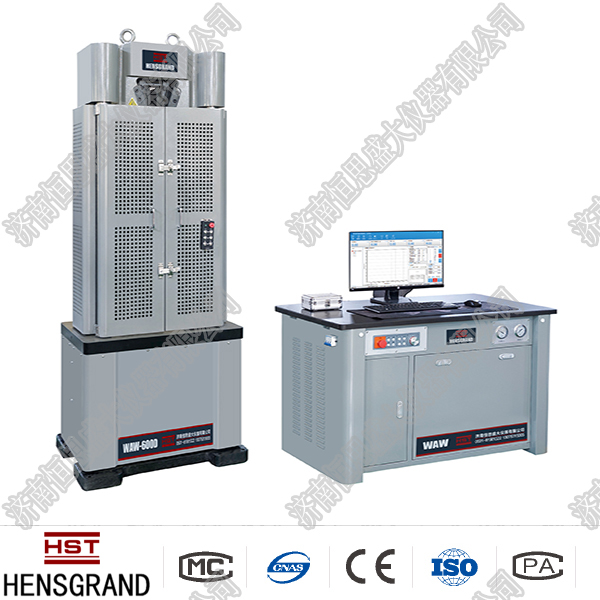
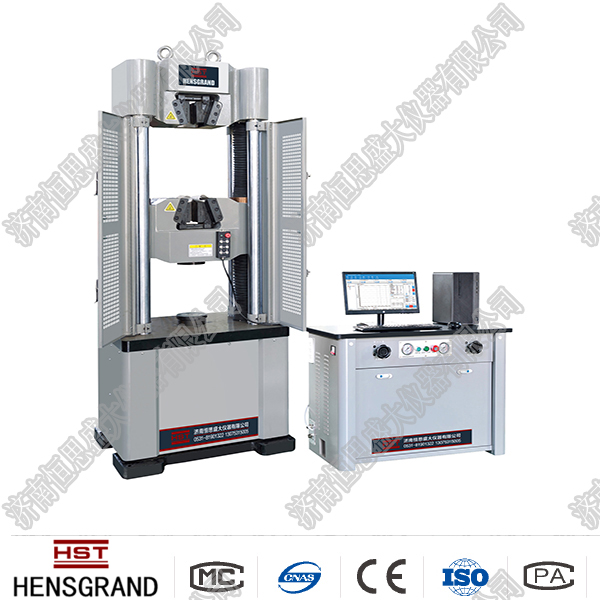
Tension testing machine is also calledUniversal Material Testing Machine. or tension machine, integrated design of static electricity, consists of the main part, mechanical part, hydraulic system, force measurement system, etc. The force measurement system is mainly composed of force measurement sensor, transmitter, microprocessor, load driving mechanism, computer and color inkjet printing mechanism.
Uses of tensile testing machine
Tensile tests for mesh ropes, textiles, metal rods, waterproof materials, rubber, wires and cables, plastics, metal wires, and plates can be used for tensile testing machines, and additional accessories can be used for compression, bending and other tests. It has digital display of test force, continuous adjustment of test speed, automatic shutdown of sample pull-off, peak value maintenance and other functions.
Precautions and maintenance of tensile testing machine
The tensile tester should be installed in a clean, dry, non-vibration room with room temperature of 20℃±10℃. Note that beam bending tests, tests with extensometers, and equipment maintenance should be left with sufficient empty N area around the tester.
1. Installation The main body and force gauge of the tensile tester should be installed on the foundation of concrete. The foundation size should be set aside according to the appearance and foundation map, and other devices such as anchor screws and lower jaw screws, as well as other wire installation pipes. The upper surface of the foundation should be flat and water-eating. After the foundation is dried, install a test machine. Installation and preliminary accuracy of a tensile tester. Transport the main body and the dynamometer to the concrete foundation respectively. Adjust the distance between the main body and the dynamometer and adjust the direction according to the appearance and foundation map. Then, a thin piece of iron can be inserted into the bottom part of the main body and the dynamometer (between the foundation), and correct it separately with a square level with an accuracy of 0.05/1000. The preliminary alignment of the main body can be measured at two different positions of the vertical and horizontal positions of the two columns, and the non-limiting degree shall not be greater than 0.3/1000. Then, the square level can be used to lean against the vertical and horizontal positions of the outer surface of the oil cylinder to correct its vertical and horizontal positions.
2. Correct the accuracy of the tensile tester. After the above preliminary accuracy of the tester, the oil pipe, power supply and oil filling are connected for preliminary operation and test run. When the test run is good, the accuracy of the tester will be corrected. Use a square level instrument to lean on the working level, align the plumb slature of the oil cylinder, adjust or increase or decrease the horn under its seat, so that the error must not be greater than 0.10/1000. After the accuracy of the test machine is found, use cement slurry to fill all the gaps under the machine base to keep the machine base well combined with the cement foundation, and prevent the test machine from being damaged due to vibration during use. 5. The anchor nut and the test machine are not allowed to be tightened before the cement is dried. (The cement drying time is generally no less than 10-15 days) After the cement is completely dry, tighten the lucky foot nut and determine whether the installation accuracy of the test machine is consistent with the correcting accuracy. If it does not match, it should be corrected again. During the use of the tensile tester, since the vibration during the test is prone to vivid phenomena, the relevant parts should be tightened after the tensile tester is used for a period of time.
3. Take over. When installing the oil pipe with the main body and the dynamometer, the inside of the oil pipe should be washed with kerosene to ensure the cleanliness of the oil circuit. Pay attention to whether the gasket at the joint is complete to prevent oil seeping during high pressure.
4. Selection of oil specifications. During hydraulic rotation, you can use hydraulic oil for precision machine tools, or you can use oil with similar specifications. The kinematic viscosity of the oil is 100℃) 11-14 centiks.
5. Oil filling and oil drainage. Open the air filter on the oil tank and pour the oil into the oil tank. The amount of oil injected at one time is about 24 kg. The oil specifications used can be found in the oil specification introduction. When draining oil, just open the oil nozzle at the bottom of the left side of the dynamometer. The service life of the oil is determined based on the climate in various places. If you find that the oil starts to deteriorate or is filthy and cannot be used, you should replace it with new oil.
6. Connect the power supply The electrical device of the tensile tester is in the dynamometer, and the four-wire system of power supply is used. The circuit between the main body and the dynamometer is not connected. Before powering on, clean the dust and other impurities in the electrical box. After introducing the power cord, press the "Power" button on the dynamometer panel to prove that the power supply has started. At this time, you can press the oil pump ⒍ button to observe the rotation direction of the motor, and then press the jaw seat lift button to check whether the lifting and lowering action of the lower jaw seat matches the text shown on the button, and at the same time check whether each limit switch is in effect.
7. Lubrication: Lubricating oil can be poured on the lower jaw screw to lubricate the screw rod and the screw nut. There is an oil injection hole on the machine base, which injects oil into the oil lubrication worm. The scale of the oil in the oil stool can be measured by the oil measuring needle, and the oil level of the oil stool can be no more than the lower flat part of the oil measuring needle. The lower end of the oil-testing needle is slashing the buttocks arc
8. The initial operation and test run of the oil pump. Press the button on the dynamometer surface to start or stop the oil pump from rotating. When the wire connector is first operated or changed after installation, check whether the oil pump oil circuit is unobstructed.
9. Safety device The main cylinder and hydraulic chuck department of the tensile tester are equipped with protective overflow valves and limit switches.
10. Things to note during operation: 1. If the oil pump suddenly stops working during the test, the added load should be removed to reduce the oil pressure. After inspection, the oil pump should be restarted for the test. The oil pump should not be started under high pressure or the cause of the accident should be checked. 2 If the electrical appliance fails when the tensile tester is working and the start or stop buttons do not work, the power should be cut off immediately to stop the tester from running. 3. Non-operating personnel are prohibited from operating on the machine.
11. Maintenance of tensile testing machine. All parts of the tensile testing machine should be wiped clean frequently. Wipe without paint cleansing. After applying cotton yarn to a small amount of engine oil, wipe it again to prevent rust. Pay attention to wiping during the rainy season. When not in use, cover it with a dust cover to prevent dust from invading. After each test, the test bench is lowered and the piston does not fall on the bottom of the oil cylinder, leaving a little distance for the next use. All shutters on the dynamometer should not be opened and placed to prevent dust from entering the interior, affecting the sensitive performance of the measuring mechanism. The oil pump motor should be turned off when the test is suspended.
Recommended productsPRODUCTS