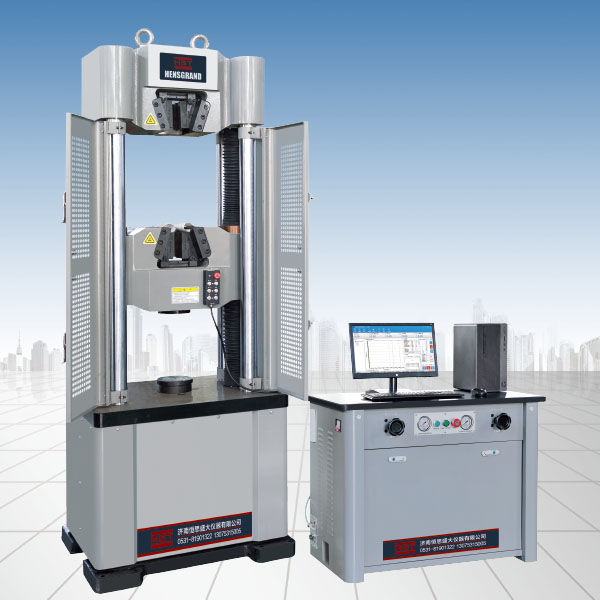
WEW-1000G microcomputer screen display universal test machine

WEW-1000G microcomputer screen display universal test machine

This machine has a four-column, double lead screw, and a cylinder-mounted main machine structure, and the control oil source is a piano-type oil source control cabinet. The tensile space is located above the host, and the compression, bending and shear tests are located below the host, that is, between the moving beam and the workbench. The adjustment of the test space is achieved by moving the position of the middle beam. The movement of the middle beam uses a gear reducer motor to drive the chain transmission. Manually adjusting the oil inlet volume of the oil supply valve can satisfy the adjustment of the test speed of the material such as tensile, compression, and bending. After the test is completed, the computer can automatically calculate the test results of the material's elastic modulus, tensile strength, upper and lower yield strength, specified non-proportional extension strength, maximum force total elongation, after-break elongation and cross-section shrinkage, and can directly output standard test reports and test curves, or output statistical reports in EXCELL and WORD formats.
Performance Features
1. The host adopts a four-column high-rigid frame structure, which has stable support, stable loading and beautiful appearance;
2. The host base is precision cast using QT500-7 to reduce equipment operation noise and improve equipment rigidity;
3. Both the moving beam and the upper beam are precision cast and CNC precision machining to ensure the neutrality of the sample clamping;
4. The mobile beam lifting system uses grinding lead screws and precision gear reducers to reduce the noise generated when the beam lifts and lowers;
5. The jaw seat with a special structure is designed to prevent damage caused by the jaw seat in a trumpet-shaped deformation and improve the service life of the equipment;
6. The jaw adopts a dovetail groove structure, with a hardness of up to 58-62HRC, which has the advantages of convenient installation and durability;
7. The measurement and control system has a fast running speed, a gentle interface, and has multiple sample information input modes, which can meet the test of different materials; 8. The sample information is convenient to enter, and the test of multiple samples can be completed at one time after inputting sample information of the same conditions;
9. Samples with the same conditions can be superimposed on various test curves, which can clearly identify the stability of the material;
10. The test force display has high accuracy and the test force display has the resolution of the entire process to ensure the accuracy of the experimental data measurement;
11. The test data (test force, loading rate) and test curve are displayed dynamically in real time on the screen as the test process;
12. Automatic overload protection shutdown when the load exceeds 3-5% of the full scale.
Main indicators
Product model | WEW-100G | WEW-300G | WEW-600G | WEW-1000G |
Host structure form | Dovetail groove jaw + four columns + double screw + full protection + main cylinder underlay | |||
Maximum test force | 100kN | 300kN | 600kN | 1000kN |
Test machine level | Level 1 | |||
Test force measurement range | 2%-100%FS | |||
Relative error of test force display value | ±1% of the displayed value | |||
Displacement display accuracy | 0.01mm | |||
Displacement measurement accuracy | ±0.5% | |||
Deformation display accuracy | 0.001mm | |||
Deformation measurement accuracy | ±0.5% | |||
Crossbeam movement speed | About 220mm/min | |||
Maximum piston speed | 300mm/min | 150mm/min | 100mm/min | |
Piston stroke | 250mm | |||
Control method | Manual loading | |||
Stretch space/compression space | 780/550mm | 900/650mm | 950/700mm | |
Left and left spacing of columns | 485 | 500 | 560 | |
Sample clamping method | Hydraulic automatic clamping | |||
Circular specimen clamping diameter | Φ4-20mm | Φ10-32mm | Φ13-40mm | Φ13-45mm |
Flat sample clamping thickness | 0-15mm | 0-15mm | 0-20mm | |
Flat sample clamping width | 80mm | 90mm | 100mm | |
Up and down pressure plate | The diameter of the circular pressure plate is 160mm, and the down pressure plate is adjusted with spherical surface | |||
Control the size of the oil source | 1000*600*780mm | |||
Host size (mm) | 745×685×1905 | 760×690×2055 | 830×720×2155 | |
Power supply | Three-phase five-wire system, 380V/50Hz, 3kW | |||
Recommended informationNEWS
- [2023-07-06]Steel strand tensile tester
- [2023-07-06]Steel strand test machine
- [2023-07-03]Chain horizontal tensile testing machine
- [2023-07-03]Ring chain horizontal tensile testing machine
- [2023-07-03]Chain tensile testing machine
- [2023-07-03]Projects that can be tested by electronic tensile testing machines
- [2023-02-23]Metal impact tester
- [2023-02-16]Things to note when operating the electronic universal testing machine software
- [2023-02-16]Impact testing machine Pendulum impact testing machine selection
- [2022-11-30]What should be paid attention to when operating the electro-hydraulic servo universal test machine?
- [2022-11-30]Electronic tensile testing machine
- [2022-11-30]What is the maintenance of the impact test machine?
- [2022-11-04]Standard impact test method for metal material notch specimens
- [2022-11-04]1000KN digital display manhole cover pressure tester
- [2022-11-04]Rubber material tensile testing machine
- [2022-10-27]What should be paid attention to when installing fixtures in tensile testing machine
- [2022-10-27]Maintenance method of friction and wear tester
- [2022-10-21]Electronic universal material testing machine is used for wire tension testing, what is the jaw breakage


